Writing your first RapidSMS app
One of the best ways to learn anything new is by learning by example.
In this tutorial, we’ll be building a RapidSMS app to track vehicle mileage.
First, let’s consider the problem: We are interested in building an application capable of allowing a motorist to track his vehicle mileage.
The idea is that before starting a trip, the driver sends the mileage reading on his odometer to RapidSMS and on completing the trip, sends the mileage reading on the odometer again to RapidSMS.
RapidSMS in responding to the second message will report cool things like the total distance travelled and the average speed.
Here are certain things we will be keeping track of:
- The time the messages were sent
- The mileage readings
- The driver (we would need some way to identify the driver)
Installing RapidSMS
The best way to install RapidSMS is to clone it from its repository (this way you are sure to be installing the bleeding edge version of the software). In order to do this, you’ll need to have Git installed on your machine. Please visit http://git-scm.com/ for more information on getting Git installed.
Assuming you’ve installed git, the following steps will get RapidSMS setup on your machine:
~$ git clone git://github.com/rapidsms/rapidsms.git
~$ cd rapidsms
~rapidsms$
Configuring RapidSMS
RapidSMS configuration options are stored in the rapidsms.ini file in the root directory of the application. You can modify the settings here using your favorite text editor. If you’ll be doing development work however, we recommend copying the file to a new file called local.ini.
During the initialization of RapidSMS, the application will look in the directory for any file named local.ini for configuration settings. If this is not found, then rapidsms.ini will be loaded instead.
In the configuration file, there are several configuration options and sections for now, we’ll not treat them.
Firing up RapidSMS
Before starting RapidSMS, we need to first of all synchronize the database. This step allows all necessary database tables which are persistent stores for the Django database models that RapidSMS uses.:
~rapidsms$ python rapidsms syncdb
Creating table auth_permission
Creating table auth_group
Creating table auth_user
Creating table auth_message
Creating table django_content_type
Creating table django_session
Creating table django_site
Creating table django_admin_log
Creating table httptester_message
Creating table locations_locationtype
Creating table locations_location
Creating table patterns_pattern
Creating table reporters_role
Creating table reporters_reportergroup
Creating table reporters_reporter
Creating table reporters_persistantbackend
Creating table reporters_persistantconnection
Creating table logger_incomingmessage
Creating table logger_outgoingmessage

You just installed Django's auth system, which means you don't have any superusers defined.
Would you like to create one now? (yes/no):
Your output may vary depending on the type of applications that are installed and/or enabled. You can answer yes to the question to create a superuser and fill out whatever you want to use as username, email address and password.:
Would you like to create one now? (yes/no): yes
Username (Leave blank to use 'username'):
E-mail address: username@domain.com
Password:
Password (again):
Superuser created successfully.
Installing index for auth.Permission model
Installing index for auth.Message model
Installing index for admin.LogEntry model
Installing index for locations.Location model
Installing index for reporters.ReporterGroup model
Installing index for reporters.Reporter model
Installing index for reporters.PersistantConnection model
~rapidsms$
Now that our database has been synchronized, we can fireup the internal webserver:
~rapidsms$ python rapidsms runserver 8000
Now try opening the following url in your web browser: http://localhost:8000/
Congratulations you have successfully installed RapidSMS and gotten it to run.
Creating the application stub
RapidSMS comes with tools to make creating applications as easy as possible and one of such is to create the skeleton for your application so you can just write the logic where you need the processing to be done.
To create the application skeleton type the following:
~rapidsms$ python rapidsms startapp mileage
Don't forget to add 'mileage' to your rapidsms.ini apps.
~rapidsms$
As you can see in the message, in order for the application to be of any use it has to be inserted in the list of applications. Applications are not enabled in RapidSMS unless they are included in the list of apps.
Make a copy of the rapidsms configuration file rapidsms.ini:
~rapidsms$ cp rapidsms.ini local.ini
Next, use your favorite text editor and open the local.ini file. Under the [rapidsms] section, add mileage at the end of apps directive so it looks like this:
[rapidsms]
apps=webui,ajax,admin,patterns,reporters,locations,messaging,httptester,logger,echo,mileage
backends=http
This step has created a directory named mileage in your RapidSMS apps directory which is located at rapidsms/apps. We will change directories into this so we can work with it.:
~rapidsms$ cd apps/mileage
~rapidsms/apps/mileage$
In this directory, are four files of importance:
- app.py
This file is where your application logic is stored. We’ll be working more with this file.
- models.py
Your Django models are defined in this file. We’ll be using this file to define the model structure for persisting data in the database
- tests.py
One of the ideologies used in developing RapidSMS is the test-driven design ideology. You store unit tests for your app in this file.
- views.py
Django is at the core of RapidSMS and for apps that require a web interface, the views logic is defined here.
Defining the Django model
Open the models.py file in your favorite text editor and type in or copy and paste the following code listing in it.:
from django.db import models

# Create your Django models here, if you need them.
class Mileage(models.Model):
    start_mileage = models.PositiveIntegerField(null=False, default=0)
    start_time = models.DateTimeField(null=True)
    stop_mileage = models.PositiveIntegerField(null=False, default=0)
    stop_time = models.DateTimeField(null=True)
    reporter = models.CharField(null=False, max_length=20)
    completed = models.BooleanField(default=False)
Syncing the database
After defining your Django model, you need to synchronize these changes. Synchronizing these changes will create the necessary database tables and indexes that will be used for storing and retrieving data.
Type in the following from your project directory:
~rapidsms$ python rapidsms syncdb
Creating table mileage_mileage
~rapidsms$
Writing the application logic
Ok now things really get interesting. We are going to write application logic that will take an incoming message, parse it, extract data, store in in a Django model (which maps to a database table) and send a response.
So you can type in the code and reflect on how it works later, I’m providing the code listing below. This should go into the app.py file in the mileage app folder.:
# vim: ai sts=4 sw=4 ts=4 et
import rapidsms
import re
from models import *
from datetime import datetime

class App (rapidsms.app.App):

    # message pattern expected: 'mileage start number' or 'mileage stop number'
    # in order to take care of possible typos it will accept a mispelled milage
    # for the keyword: 'milage start number' or 'milage stop number'
    pattern = re.compile(r'^mile?age\s+(start|stop)\s+(\d+)', re.IGNORECASE)

    def start (self):
        """Configure your app in the start phase."""
        pass

    def parse (self, message):
        """Parse and annotate messages in the parse phase."""
        pass

    def handle (self, message):
        response = self.pattern.findall(message.text)
        if response:
            entry = response[0]
            entry_time = datetime.now()
            reporter = message.connection.identity
            mileage = int(entry[1])

            if entry[0].lower() == "start":
                # Persist entry in the database
                Mileage(
                    start_mileage=mileage,
                    start_time=entry_time,
                    reporter=reporter).save()

                # Generate a response
                message.respond("After your trip is completed, please send: MILEAGE STOP mileage_reading")
            elif entry[0].lower() == "stop":
                try:
                    # We attempt to find the latest "open" entry. An "open"
                    # entry is one that has been created using MILEAGE START
                    # but has not been "closed" with a MILEAGE STOP
                    reading = Mileage.objects.filter(completed=False,reporter=reporter).order_by('-start_time')[0]
                    if reading:
                        reading.stop_mileage = mileage
                        reading.stop_time = entry_time
                        reading.completed = True
                        reading.save()

                        # Reporting...
                        distance = reading.stop_mileage - reading.start_mileage
                        distance_string = "%d miles" % distance if distance > 1 else "%d mile" % distance
                        total_time = reading.stop_time - reading.start_time
                        # Had to do the following to prevent integer division by zero
                        total_seconds = 1 if not total_time.seconds else total_time.seconds
                        speed = (float(distance) / total_seconds) * 3600

                        days = hours = minutes = 0
                        time_string = ""

                        # While generating the time string, humanize the output a little bit
                        days = total_time.days
                        if days:
                            time_string += "%d days " % days if days > 1 else "%d day " % days
                        hours = total_time.seconds / 3600
                        if hours:
                            time_string += "%d hrs " % hours if hours > 1 else "%d hr " % hours
                        minutes = (total_time.seconds % 3600) / 60
                        if minutes:
                            time_string += "%d mins " % minutes if minutes > 1 else "%d min " % minutes
                        seconds = total_time.seconds % 60
                        time_string += "%d secs" % seconds if seconds > 1 else "%d sec" % seconds

                        # Generate response to send back
                        response = "Your trip of %s took %s. Your average speed was %dmph" % (distance_string, time_string.strip(), speed)
                        message.respond(response)
                except (Mileage.DoesNotExist, IndexError):
                    message.respond("You cannot complete a trip you didn't start :)")

            return True
        else:
            return False

    def cleanup (self, message):
        """Perform any clean up after all handlers have run in the
           cleanup phase."""
        pass

    def outgoing (self, message):
        """Handle outgoing message notifications."""
        pass

    def stop (self):
        """Perform global app cleanup when the application is stopped."""
        pass
In the code listing above, we create our app by creating a class named App that inherits from rapidsms.app.App. This is the convention. Thankfully, the startapp command creates this so all you need to do is fill in your code. As you would have noticed, we are only writing code to override the handle method.
Our application gets the contents of the text message from the message parameter that is passed to the method as a parameter. The message parameter is an object from where we can read the contents of the message, respond to the message or even read the sender of the message.
Here are a couple of useful attributes and methods available in the message object:
- message.text
This attribute contains the message contents
- message.respond(response)
Use this method to respond to a message. response is a string with the contents of the response.
- message.date
In cases where you need to access the time the message sent, this is how you gain access to this value. It’s a datetime object so you might need the datetime python library to manipulate it.
- message.connection
This is an object that allows you to access connection parameters like the identity (phone number, irc nickname, etc.) and backend. Most times you will need only the identity and you can access it from the attribute message.connection.identity.
You’ll also notice the use of an object named Mileage. This is the Django model we defined earlier for storing data.
So we receive a message containing the string mileage start 2000920. This message gets processed by the handle method:
We do a regex search on the string. If it matches the pattern, it is processed if not, it is left alone. During processing, we read the sender of the message, the date and time the message was sent and the mileage reading.
We check if the message is a start message or stop message.
If it is a start message, we store those parameters we’ve extracted from the message in the database.
If it is a stop message, we attempt to retrieve the latest uncompleted entry from the database. If this doesn’t exist, we assume that the reporter is attempting to stop a trip that has not been started and we send a friendly response back. If we find an entry, we update the entry with the stop mileage, stop time and set the entry as completed.
We then do a few calculations to determine the trip time, distance and average speed. We then generate a response and send this to reporter.
Note
The ordering of your apps in the configuration file is quite important. Every app in the apps directive gets to process messages in the order in which they are listed. The echo app for instance, simply echos whatever it receives so you would want the mileage app or your own app to come before it or you can totally disable it by removing it from the list.
Testing your application
Testing your app, can be done by using a simple backend included in RapidSMS called the http backend. By default, this backend is enabled.
To access this backend, you visit http://localhost:8000/http
For this to work, your RapidSMS router and included RapidSMS internal webserver must be running.
Starting the RapidSMS router
This is how to start the RapidSMS router:
~rapidsms$ python rapidsms router
You will see a couple of startup messages. If all goes well, you should see the following at the end.:
2009-07-09 17:28:36,637 INFO [router]: SERVING FOREVER...
To stop the router, press CONTROL-C
Starting the RapidSMS internal webserver
Earlier in this tutorial, we started the internal webserver. The procedure remains the same. This however, should be done in a separate window:
~rapidsms$ python rapidsms runserver 8000
Validating models...
0 errors found

Django version 1.0.2 final, using settings 'webui.settings'
Development server is running at http://127.0.0.1:8000/
Quit the server with CONTROL-C.
Now you can visit http://localhost:8000/http on your web browser.
Type in any phone number you want to use for the test and type in your message: e.g. mileage start 2000. A couple of moments later (just to simulate a delay), send another message with the content: mileage stop 2020 (for instance).
You will see output similar to the screenshot below:
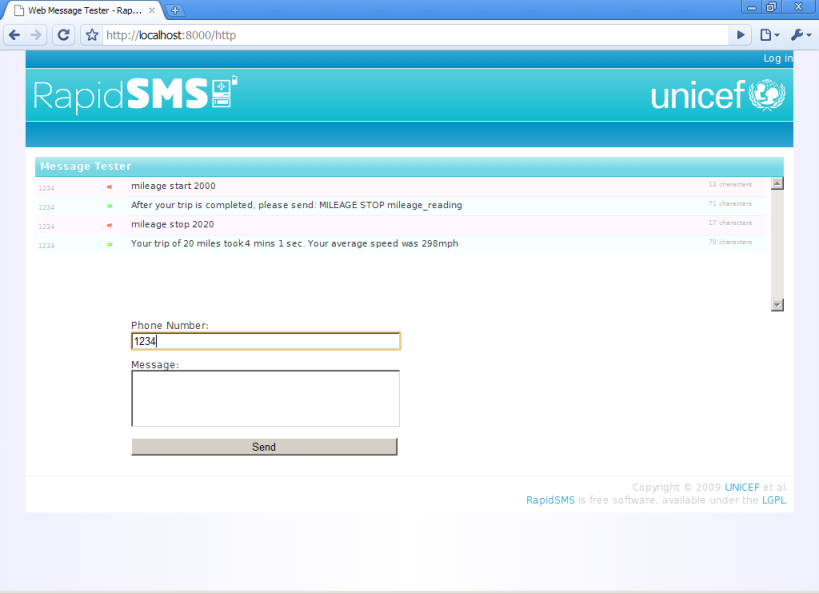
The red lines indicate messages you send to RapidSMS and the green lines indicate messages you receive from RapidSMS.
Congratulations! You’ve just written and tested your first RapidSMS application.